I made a fair bit of progress this year on the house. The first part of the season was taken up by gardening and tending the grapes, so I wasn't able to start working on the house until about June, when I started by finishing the last section of earthen floor. Last year I wasn't able to finish the section of floor under the batteries below the stairs, so I moved the batteries and finally finished that section. Finishing this section was key to being able to continue the interior construction of the bathroom, which was to be tucked under the stairs.

Another project I worked on fairly early in the season was doing the fascia and soffit and the shingling on the gable ends. The scaffold had been set up all winter and I was anxious to get it out of the way so I could see the house. It was a while before I could move it though. But I'm really pleased with how everything turned out. I did this fishscale design with the wooden shakes. It wasn't that hard to shape each piece of wood and nail it in place, and it added a lot of character to the house.


I really don't like doing this kind of woodwork. The shingling was fine but getting all these reclaimed tongue in groove boards to fit together and getting them nailed up standing on scaffold so high up is not fun for me. After much cursing I was glad to be done with that work.
This summer I got the chance to babysit Mister, an extremely cute rat terrier, while his owner Nani was away. He is definitely my favorite dog at DR. Ever since I took care of him he makes a point of coming to visit me in my house from time to time. He even will scratch at the door sometimes if he knows I'm in there.


 After finishing the floor I started framing in the bathroom on the first floor. There is a separate area for the power system in the smaller wedge of space under the stairs. These pictures show the framing, door, and the beginning of the light clay straw walls. I used light clay straw instead of drywall because the straw and clay are local and organic materials that also make a good surface for earthen plaster, which I think looks much better than drywall.
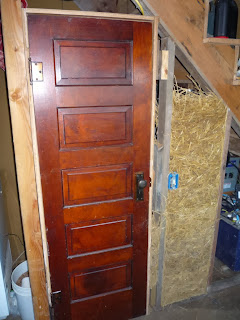
 Upstairs I walled in a walk-in closet so I have a place to put all my stuff so it is out of sight. I was sorely in need of a place like this because I'd been living with my stuff scattered throughout the second floor since the previous November. As you can see I used more light clay straw on the walls. The closet is right next to the opening for the stairway. I plan to put a railing along the opening in the future.
 This is a picture of the interior of the closet after the light clay straw was finished and I was about to start the plastering. The pole is a rod for hanging clothes on. You can also see the burlap that is used to cover the studs making them easier to plaster over.
  Below are some pictures of the downstairs bathroom after applying the finish plaster. I have been really pleased with how beautiful everything has turned out. I used local oak boards for trim. It's that kind of work that takes the most time. Plastering is easy but it's the prep work that is the most tedious. It's worth the time though, because you end up with something unique that you couldn't accomplish any other way, and that you couldn't find at Home Depot.
 This is the upstairs closet with most of the scratch coat of plaster on it. The shelves I put in are made of walnut slab wood. I like the organic look of the exterior of the closet. I will be oiling the wood with linseed oil to bring out the natural color and grain.
 This is a shot from inside the walk-in closet. This is the same picture as one above, but with the finish plaster on. The pieces of wood in the plaster are nailing strips for future shelving.
 I was able to get in the interior finish plastering in just the nick of time because of late season warm weather. The house looks much different with a smooth coat of plaster on. It looks much more finished.


I still have to lay some tile on the window sills, but that will be a winter project. I also have to paint the ceiling. I would like to use milk paint, which is not toxic and doesn't contain harmful chemicals. I experimented with some on the interior of the bathroom (below). I mixed the paint up myself with lime, quark, a cheese made from organic milk, and earthen pigment. The only drawback is that it requires the use of a lot of natural pigment, which can be pretty expensive, considering a quart of paint doesn't get you very far. And given how much milk is required to make a quart of paint, the cost of the organic milk, even at $2.50 a gallon, can make a gallon of milk paint pretty pricey. It goes on earthen plaster easily, though and I like the way it looks. And it's so much better not to have to breath paint fumes. I guess it's the cost of doing something more sustainably.

3 comments:
looks great dan!
at first i thought you had a ceiling fan in your closet until i realized it was a mirror :)
that milk paint looks nice in the bathroom.
Your hard work has really paid off Dan. The house is beautiful!
Your walls look lovely! I recently started following your blog because my husband and I are considering using clay and straw insulation in the container home we are building. Your pictures really show how nice it can look!
Post a Comment