Monday, November 16, 2009

Straw walls and lime plaster


The building season is pretty much over now and the house has come together pretty fast. Sorry I haven't been posting to this blog as frequently as I would like. I was busy working on the house, then we had a few weeks of low to no power so my internet access was limited.

We had some great weather in early November, which made plastering much more pleasant. It worked out well because the few weeks before the good weather, we had a lot of rain, and fortunately most of the work was baling the walls under the tarps. Of course it was pretty gloomy working under the tarps on such gloomy, cold days. The baling took a lot longer than expected. The lower parts of the walls went up fast, but the tops of the walls required quite a bit of notching, which is time consuming work.

Tuesday, September 15, 2009

The roof is on

We've continued with work on the house. It is definitely our highest priority and taking most of our time though we still try to fit in a little canning on the weekends. The weather lately has been ideal for building.

We've made a lot of progress on the framing and have finished tinning the roof. The house has fully taken shape. We have wired it as well and Mary Beth is insulating the south wall with light clay straw. We started the baling in the last few days, and have made some progress on the first floor. The cistern went in as well and I'm working on the plumbing to it. I don't have time to update this blog fast enough to keep up with our progress. Unfortunately, it seems unlikely that we will have the house ready to live in by the winter. We would like to take our time and make sure we do it right and there is really too much to do before winter to get it ready to live in.


These clowns have been helping us build our house lately. They are Dan and Danielle, new residents of DR. They do performance art and Dan is a trained clown. They are fun to have around.


We've also been finding some time to continue canning veggies. Lately tomatoes have been the major crop. Sauce, salsa, juice. We are stocked for winter.


I haven't shown the chickens lately so here are a couple pics of them. I think I've decided to keep most of them through the winter so we can have eggs next year. I'd originally planned to eat the chickens before winter, but now I'm thinking I'll like having eggs.


Monday, August 24, 2009

Ironweed blooming

You can mark the change of season here by the types of blooming flowers on the land. Right now Ironweed, with its purple flower clusters is everywhere, along with white-flowered false boneset. Soon goldenrod will be the dominant flower, meaning winter is not far off. It and purple aster are the last to bloom here. Below is also a Whorled Milkweed.

Work has continued on the house, though slower than hoped. It seems there are always many delays here preventing us from making progress. The recent monsoons have made some things difficult lately. August is usually unbearably hot and dry, but the only unbearable weather came in June. Last week we got 5 inches of rain in a 12 hour period.

We put up the second floor joists a few weeks ago. We are doing 2x6s between the oak beams and orienting them north-south over the cantilever so the joists will be holding some of the weight of the second floor south wall that will hang out about a foot and a half beyond the first floor south wall.

You can see the 6x6 knee braces on the bottom of the two middle beams that will help transfer some of the weight of the cantilever onto the wall. There will be four of these eventually.

After putting up the joists we put on a subfloor of reclaimed OSB and plywood.

Next, we put on the north wall second floor posts and a girt to connect them.

We added the other two knee braces on the cantilever.

This is the view of the garden and backyard from our second floor. It will be a great view to see every morning.

Then we started on the second floor south wall. It will be a stick framed wall like on the first floor. I think the house looks best from the south. The other villagers won't see the best side, but we will from the backyard.

With the floor on the second floor blocking the sunlight we were able to see how the cantilever will block the high summer sun. Even at this time of year, there is no sun coming in the south side windows. Of course, that's good because we want shade in August and for most of September.

We also walled in the future root cellar, which we'll be able to access through our kitchen floor. We are now continuing with the rafters and roof. The house is really starting to take shape.

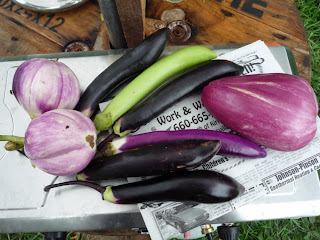
The wet season has been good for the garden overall, but after last week's rain, my carrots were rotting in the ground. Most plants have benefited from the rain. I planted eggplant and peppers in the bed that had the chicken tractor over it early in the season and they are the best eggplant I've ever grown. I love eggplant, and we've got plenty of it now.

We started pickling some veggies. My hot pickle mix of hot peppers, carrots, and cucumbers is one of my favorites.

I think I've finally mastered the art of growing beets. This year I planted a few successions and hope to have a bunch to store in the root barrel over the winter. These we turned into pickled beets, following the recipe of Alline, a DR member who with her husband has just opened up the Milkweed Mercantile and B&B here at the village.

Since I don't have much space in the garden, but I like sweet corn, I planted just two rows of it. Normally you would want to plant a larger plot of it so the ears get well pollinated, but instead I just hand pollinate the ears. It works really well if you have limited space and a small number of plants. We probably got about four dozen ears off my small bed.

The rain was really good for the garlic. We got a really big harvest this season and the heads are hanging up in our house.

Things are looking good at Wisteria Lodge this year too. The wisteria vine is way past the top of the arbor and has sprouted many new shoots now that it's reached the top. I think it will have taken over the whole thing by next summer.

Monday, July 13, 2009

The New House

We've been working on the new house a lot lately now that the garden has gotten going. It's definitely been a learning experience because at every step we seem to make some mistake and have to correct for it. Most of our problems are the result of working with reclaimed lumber that is not up to par. We are trying to make use of old barn timbers as much as possible, but we are finding they are not as sound as they might appear on the surface. I notched a 14 foot long corner post and we put it up only to decide after trying to secure it to the foundation that the wood was not sound enough to use it.

We started in late May when my parents visited. My Dad brought his miter saw and we worked together to cut all the framing for the south wall on the first floor. It took us a couple of days to cut and assemble the wall from 2x6s we'd salvaged from a building in nearby Rutledge. It was a great help for my parents to come and spent time working on the house. When they first came the weather wasn't cooperating and the rain made it difficult to get any work done or have power to do work. They left for a couple days and came back when the weather had gotten better.


After we finished the wall it sat there for a while before we were able to get the rest of the timbers ready and put it up. We put down a strip of sill seal and got a bunch of people to come help us lift it up into place. This only took a couple of minutes. We braced the wall and suddenly it looked like a house was going up.


Building a house like this we are finding it very helpful to live in a community. When we need help lifting timbers we round up a group of willing neighbors and the job seems to go quickly. Huge heavy timbers are lifted into place easily with many hands helping. We are using a method of timberframing that uses fasteners, angle irons, and plates to join timbers together for the framing. Instead of assembling entire walls or "bents" as you would in traditional timberframing, we are putting up timbers one by one and connecting them with metal plates and bolts. I found a rusty old stand of some sort near our machine shed, made of metal angle irons. I cut them up into 6" pieces that could be used to connect the timbers and to tie them to the foundation. This is a way of recycling garbage and at the same time saving money. Pre-fab post bases bought new are expensive, have a lot of embodied energy, and do not usually fit rough cut lumber sizes, so the homemade bases are easier to use and better in many ways. That's not to say we didn't have problems putting them in.


We are following a book called Timberframing for the Rest of Us that shows you the tricks of this more up-to-date method of timberframing. But though it talks about the ease of framing without complicated mortis and tenon joints, it's not as easy as it's made out to be. One method they recommend for joining timbers is long screws called GRK screws. You have to drive supposedly self-drilling screws these through 8" timbers and into the adjoining timber. The first couple went in smoothly, but then the wood seemed to be too hard on other joints and we ended up stripping or breaking off 5 of these $2 apiece screws before giving up on them until we could find a long enough bit to pre-drill them.

The angle irons we made worked well, but we found that despite our efforts to line up all the timbers they did not end up meeting together perfectly as they should to be able to connect them tightly. This was partly because we screwed up in fastening the posts to the foundation, and partly because some of our timbers were slightly warped or not milled very square. We'd wanted to connect them with plates, but found we couldn't when the timbers didn't line up. We are finding other ways to connect the timbers at joints, but have less confidence in the strength of the joints we are making.


You may wonder why different parts of the wall look so different. The south wall is framed in 2x6s and the rest of the walls are timber framed. The south wall has a lot of windows because the house is designed to take advantage of passive solar heat during the late season and winter, when the sun is low. It would have been difficult to insulate the south wall with strawbales as we plan to do with the other walls because the wall spaces between windows are so narrow. So we thought stick framing would work better for that wall. The foundation wall is narrower on that side as well. The house looks a lot bigger than it will actually be on the inside because three of the walls will be strawbale. The timberframing on three walls will make baling the walls easier (we hope) because there will be much more open space between bales and this will mean less notching of the bales to fit them into the walls. We could have had a load bearing strawbale wall, which has no framing, but that would have limited our house to one story because bale walls are not stable above one story without framing. The framing also allows you to put a roof over your structure before beginning to bale the walls. Without the roof to keep out the rain, you are much more likely to end up with wet bales and moisture in the walls that will be difficult to get out before it does damage.

Our most recent workparty was to put up the four 16 foot beams that will be the second floor. We were worried these beams would be too heavy to lift into place and comments from others were doubtful as well, but it's amazing what you can accomplish with many hands. We were able to quickly figure out the easiest way to lift the beams up onto the two scaffolds we were using and from there lift them up onto the framing that was in place. Seven or eight people on a 16 ft 6x8 beam makes light work of lifting it.


Once the beams were in place, we began to secure them at the joints. We are working on the knee braces for the cantilever on the south wall. These knee braces are partly for function and partly for aesthetics. We hope they will give the cantilever an old European look. With the first floor pretty much framed, the house is starting to look like a house.